
I just love when a DIY fixes two problems in one! Button up shirts are just not my thing, I love them in theory but in practice they look pretty bad on me. The collar draws attention to my double chin, there’s always boob gape and I always come off looking pretty fat and frumpy. When I really focused on what I liked about button ups, it was the layering aspect.

Last year I embraced leggings hard and I’ve even been making my own. Leggings are really comfy and they do show off my legs nicely. I still prefer to wear things that cover my butt though, leggings aren’t pants. And that’s a hard thing because most of my tops are too short. I do have lots of stretchy skirts, which work over leggings but not over skinny leg jeans. Then it hit me! I could turn some button up skirts into tee extenders. Oh how I love garments that do double or triple duty! These shirt extenders can be worn with tees, cardigans and jumpers, transforming much of my wardrobe.

There are plenty of jumpers and tees that have a second layer or are designed to look like you are wearing a shirt underneath. I love the idea but don’t really want a single top, I want something that transforms my existing tops. Shirt extenders totally exist ( I plucked all of these from Pinterest)but most of the ones I’ve seen are sort of lacy or feminine in a way I’m not really going for. I really wanted that shirt over leggings look, so as always, a DIY is the way!

Since I didn’t have any button ups, I hit the op shops and found leopard print shirt. I thought of going sheer but I wanted more bum coverage that that so I chose a silky but opaque shirt. The shirt basically fitted me, it was a couple of sizes too big. You want to choose a shirt that loosely fits over your hips/tummy but not too loose or it will be quite gathered. I tried on my shirt and decided where to cut it.And now you have seen this gorgeous photo, you’ll know why I don’t wear button ups! The things I show you guys…

Since I have a big round belly, anything elasticated works it’s way to my slimmest point, my natural waist. So I planned on cutting my skirts so they would sit there. If you don’t have that issue, just decide where you’d like the extender to sit. I marked the cutting point with a pin and whipped the skirt off. I added some seam allowance to my marker pin and marked straight across the skirt. I cut along my marked line and I was read to sew.

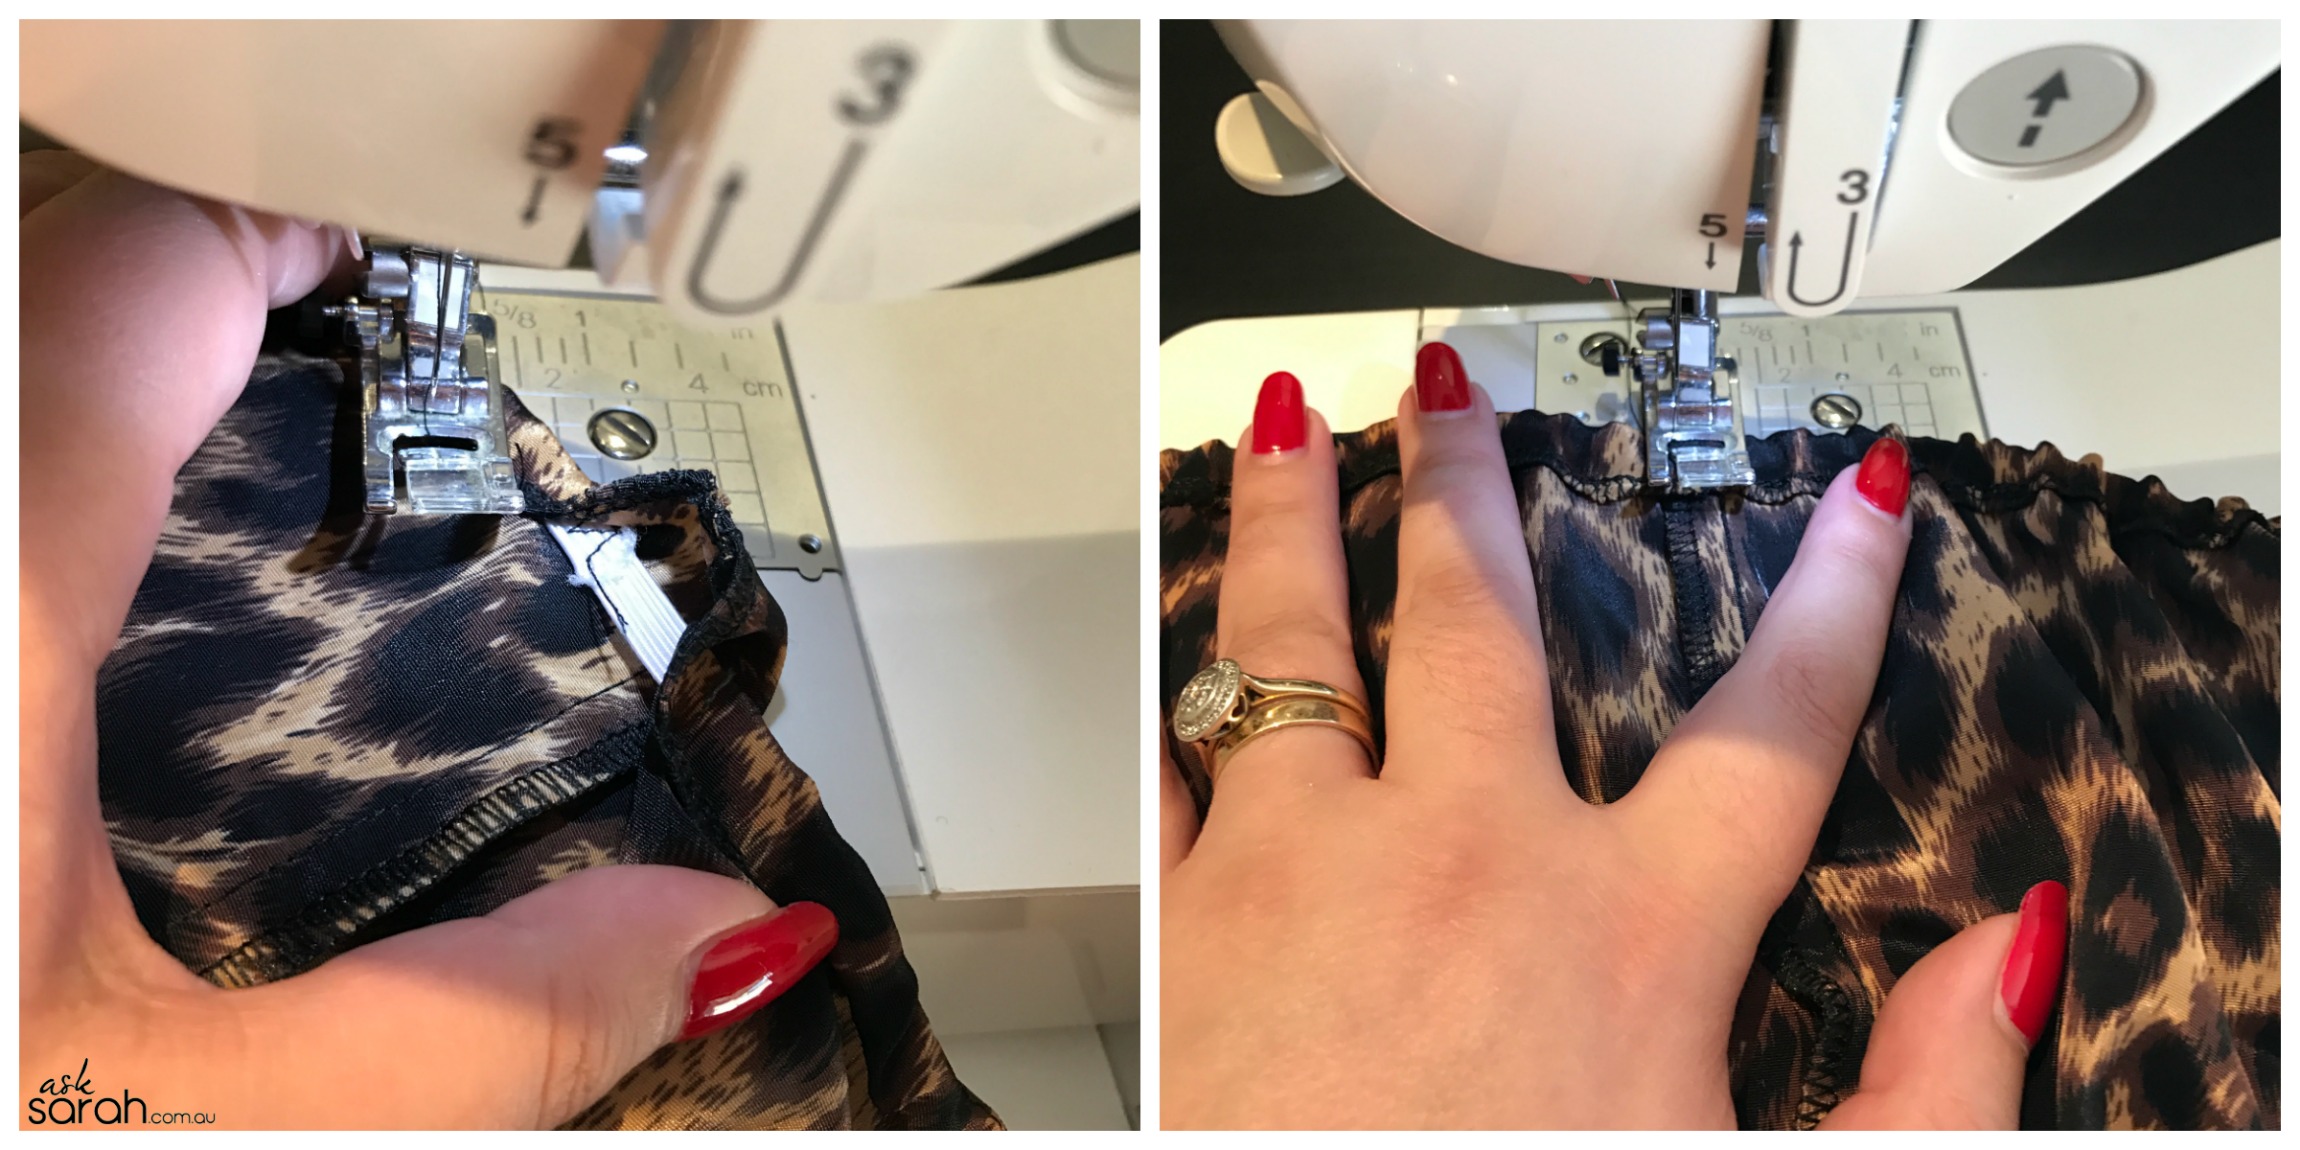
My fabric would definitely fray and I wasn’t keen to add waist bulk, so I used the mock overlock stitch on my sewing machine. You could absolutely use and actual overlocker/serger but I wasn’t bothered enough to get it out. If you were using a really light fabric, a chiffon perhaps, I would mock or real overlock (or just zig zag) the edge and then double fold like a normal hem. If you want to see how the mock overlock works, I have a slo mo in my mexican table runner post.
My fabric would definitely fray and I wasn’t keen to add waist bulk, so I used the mock overlock stitch on my sewing machine. You could absolutely use and actual overlocker/serger but I wasn’t bothered enough to get it out. If you were using a really light fabric, a chiffon perhaps, I would mock or real overlock (or just zig zag) the edge and then double fold like a normal hem. If you want to see how the mock overlock works, I have a slo mo in my mexican table runner post.

I folded the now overlocked edge over enough to accommodate my elastic (I had fairly skinny 6mm elastic) and sew a straight stitch all around, except I left a 5cm gap to thread in my elastic. I threaded in the elastic, making sure both ends were sticking out and tried the extender on. I decided how long the elastic should be and sewed the ends together at that size. Once the elastic was in place, I sewed up the gap in the waist.
I tried the shirt extender on and played with the gathers. I felt it looked best when most of the gather was at the back, leaving the front ruffled but not bulky. So I arranged the gathers as I wanted them and pinned through the elastic at the side seams. I put a quick stitch in the side seams, just like in these skirts, to keep it that way.

And then I had a sweet little shirt extender! I wore it to my Sewing Group (come join us!) for it’s first little outing. I wondered if anyone would notice that the rest of the skirt was missing… No one commented (maybe they are polite?) and so I asked them if they had noticed. I got a round of, ‘Huh, now you mention it’ and ‘Oh, I hadn’t noticed!’. So I flipped up my tee and showed them my glorious trickery! They loved the idea! Beautiful Brita and I share a love of 70’s polyester and Brita thought it would be a great way to make some wearable shirt skirts from some of the shirts she had been holding on to. I have to say I love this idea more than my own! So in you have some unloved shirts and too short tees, you know what to do……


12 Comments
Oh you are so wonderful and inspirational. I now can look the way I feel inside, and that is fun and fabulous and not frumpy and old fashion. Thank you, thank you!! 😘💖
Oh I am so super glad that this has been helpful to you! I have lots of easy sewing tutorials that you can use to spice up your wardrobe. Send me pics of what you make, I’d love to see!
Looks Fabulous, I envy your skills and your outfit!😍
Thank you! This is an easy project for a beginner if you want to give it a try…
I love this! I’ve been embracing leggings myself, but alway feel a little too exposed, I’ve been eyeing some different style extenders and they all seemed a bit too frilly and delicate- not me at all- but using a fun edgy print like you did would really add a punch of color to my mostly black and grey wardrobe. GENIUS!
So glad to be of help! I’d love to see what you make xxx
Thank you very much. Amazing idea.
love the way you transformed the shirt it looks great! thank you for the idea.
Than you! I hope you are off making your own xx
Iv been thinking of this concept but wasn’t sure…thanks a ton for all the ideas and for sharing your pictures.
My pleasure! Happy sewing x
I just bought a ton of graphic tees that I need to lengthen Love this idea!